概述
为了使用上这套上古系统来做统一登录认证(没用AD是因为它收费),查阅了很多资料并亲身实践,下面的步骤及设计流程
可以正常工作,除非我记录异常😂
这套系统可以
- 各系统统一认证
- 可以通过KeyCloak修改OpenLDAP中用户的密码或者其他信息(需要自己定制)
- 更可以通过KeyCloak集成SAML/OAUTH2/OIDC
参考
首先列出参考文章,致敬这些前行中并留下实践成功的先行者(OpenLDAP着实让我头疼)
- OpenLDAP安装配置
- KeyCloak的安装及配置
- 集成
环境及组件
- OpenLDAP
- bitnami/openldap:2.6.6-debian-11-r40
- KeyCloak
- keycloak/keycloak:22.0
- MySQL:8.0.27
- Nginx-1.20.2
- Docker-20.10.25 docker-compose-v2.1.1
OpenLDAP安装及配置
OpenLDAP+PPolicy+Memberof+PqChecker+MirrorMod Replication+TLS安装及配置
以如下的组织结构为例

需要A、B 2台服务器
A、B服务器上公共操作
如果在同一台机器上做实验,请做对应的修改,后续文档会通过注释说明
使用docker-compose及如下配置安装OpneLDAP
1
2
3
4
5
6
7
8
9
10
11
12
13
14
15
16
17
18
19
20
21
22
23
24
25
26
27
28
29
30
31
32
33
34
35
36
37
38
39
40
41
42
43
44
45
46
47
48
49
50
51
52
53
54
55
56
57
58
59
60
61
62
63
64
65
66
67
68
69
70
71
72
73
74
75
76
77
78
79
80
81
82
83
84
85
86
87
88
89
90
91
92
93
94
95
96
97
98
99
100
101
102
103
104
105
106
107
108
109
110
111
112
113
114
115
116
117
118
119
120
121
122
123
124
125
126
127
128
129
130
131
132
133
134
135
136
137
138
139
140
141
142
143
144
145
146
147
148
149
150
151
152
153
154
155
156
157
158
159
160
161
162
163
164
165
166
167
168
169
170
171
172
173
174
175
176
177
178
179
180
181
182
183
184
185
186
187
188
189
190
191
192
# 安装
mkdir -p /opt/data1/docker/openldap-a/openldap_data #对应修改为openldap-b
cd /opt/data1/docker/openldap-a #对应修改为openldap-b
# 构建镜像
mkdir build
wget http://www.meddeb.net/pub/pqchecker/deb/8/pqchecker_2.0.0_amd64.deb -O build/pqchecker_2.0.0_amd64.deb
cat << EOF >build/Dockerfile
FROM bitnami/openldap:2.6.6-debian-11-r40
LABEL maintainer="user01@example.com"
USER root
COPY pqchecker_2.0.0_amd64.deb /tmp/pqchecker_2.0.0_amd64.deb
RUN dpkg --force-all -i /tmp/pqchecker_2.0.0_amd64.deb \
&& chmod 777 /etc/ldap/pqchecker/pqparams.dat
USER 1001
EOF
docker build -t bitnami/openldap:2.6.6-debian-11-r40-v1 -f build/Dockerfile build/
# 安装OpenLDAP
chmod -R 777 /opt/data1/docker/openldap-a/openldap_data
# 证书是使用Let's Encrypt生成的通配符证书,并将对应证书文件拷贝到了docker-compose.yml所在目录的ssl/目录下
cat << EOF > docker-compose.yml
version: '3.7'
services:
openldap-a: #对应修改为openldap-b
image: bitnami/openldap:2.6.6-debian-11-r40-v1
container_name: openldap-a #对应修改为openldap-b
restart: always
environment:
- LDAP_ROOT=dc=example,dc=com
- LDAP_ADMIN_USERNAME=exampleadmin
- LDAP_ADMIN_PASSWORD=passw0rd
- LDAP_USER_DC=accounts
- LDAP_GROUP=groups
- LDAP_USERS=user01,user02
- LDAP_PASSWORDS=password1,password2
- LDAP_SKIP_DEFAULT_TREE=no
# 如果是单实例,可以在这里添加https支持,多实例可以用Nginx做stream负载均衡
# - LDAP_ENABLE_TLS=yes
# - LDAP_TLS_CERT_FILE=/etc/ssl/cert.pem
# - LDAP_TLS_KEY_FILE=/etc/ssl/private.pem
# - LDAP_TLS_CA_FILE=/etc/ssl/fullchain.pem
volumes:
- '/opt/data1/docker/openldap-a/openldap_data:/bitnami/openldap'
- './ssl:/etc/ssl'
ports:
- '4389:1389'
- '4636:1636'
EOF
docker-compose up -d
## 进入容器中操作
docker exec -it openldap-a bash
cd /tmp
# 删除默认创建的用户/组
ldapdelete -H ldap://127.0.0.1:1389 -x -D 'cn=exampleadmin,dc=example,dc=com' -w passw0rd cn=user02,ou=accounts,dc=example,dc=com
ldapdelete -H ldap://127.0.0.1:1389 -x -D 'cn=exampleadmin,dc=example,dc=com' -w passw0rd cn=groups,ou=accounts,dc=example,dc=com
ldapdelete -H ldap://127.0.0.1:1389 -x -D 'cn=exampleadmin,dc=example,dc=com' -w passw0rd cn=user01,ou=accounts,dc=example,dc=com
# 开启memberof/refint overlay
cat <<EOF > 01_memberof_overlay.ldif
dn: cn=module{0},cn=config
cn: modulle{0}
objectClass: olcModuleList
objectclass: top
olcModuleload: memberof
olcModulePath: /opt/bitnami/openldap/lib/openldap
dn: olcOverlay={0}memberof,olcDatabase={2}mdb,cn=config
objectClass: olcConfig
objectClass: olcMemberOf
objectClass: olcOverlayConfig
objectClass: top
olcOverlay: memberof
olcMemberOfDangling: ignore
olcMemberOfRefInt: TRUE
olcMemberOfGroupOC: groupOfUniqueNames
olcMemberOfMemberAD: uniqueMember
olcMemberOfMemberOfAD: memberOf
dn: cn=module{0},cn=config
changetype: modify
add: olcmoduleload
olcmoduleload: refint
dn: olcOverlay=refint,olcDatabase={2}mdb,cn=config
objectClass: olcConfig
objectClass: olcOverlayConfig
objectClass: olcRefintConfig
objectClass: top
olcOverlay: refint
olcRefintAttribute: memberof uniqueMember manager owner
EOF
ldapadd -Y EXTERNAL -Q -H ldapi:/// -f 01_memberof_overlay.ldif
# 配置PPolicy overlay
## 加载ppolicy模块
cat << EOF > 02_ppolicy_module.ldif
dn: cn=module,cn=config
cn: module
objectClass: olcModuleList
olcModulePath: /opt/bitnami/openldap/lib/openldap
olcModuleLoad: ppolicy
EOF
ldapadd -Y EXTERNAL -Q -H ldapi:/// -f 02_ppolicy_module.ldif
## 设置ppolicy的策略
cat << EOF > 03_ppolicy_policies.ldif
dn: ou=policies,dc=example,dc=com
objectClass: organizationalUnit
ou: policies
dn: cn=default,ou=policies,dc=example,dc=com
objectClass: pwdPolicy
objectClass: organizationalRole
cn: default
pwdAllowUserChange: TRUE
pwdAttribute: 2.5.4.35
pwdMinLength: 6
pwdCheckQuality: 2
pwdInHistory: 3
pwdLockout: TRUE
pwdLockoutDuration: 10
pwdMaxFailure: 3
EOF
ldapadd -H ldap://127.0.0.1:1389 -x -D 'cn=exampleadmin,dc=example,dc=com' -w passw0rd -f 03_ppolicy_policies.ldif
## 设置ppolicy的默认策
cat << EOF >04_ppolicy_set_default_policy.ldif
dn: olcOverlay=ppolicy,olcDatabase={2}mdb,cn=config
objectClass: olcOverlayConfig
objectClass: olcPPolicyConfig
olcOverlay: ppolicy
olcPPolicyDefault: cn=default,ou=policies,dc=example,dc=com
EOF
ldapadd -Y EXTERNAL -Q -H ldapi:/// -f 04_ppolicy_set_default_policy.ldif
## 加载pqchecker模块
cat << EOF >05_pqchecker_module.ldif
dn: olcOverlay={2}ppolicy,olcDatabase={2}mdb,cn=config
changetype: modify
add: olcPPolicyCheckModule
olcPPolicyCheckModule: /usr/lib/ldap/pqchecker.so
EOF
ldapadd -Y EXTERNAL -Q -H ldapi:/// -f 05_pqchecker_module.ldif
## 配置pqchecker为ppolicy的密码检查器
cat << EOF >06_set_pqchecker_as_pwdpolicychecker.ldif
dn: cn=default,ou=policies,dc=example,dc=com
changetype: modify
add: objectClass
objectclass: pwdPolicyChecker
-
add: pwdUseCheckModule
pwdUseCheckModule: TRUE
EOF
ldapadd -H ldap://127.0.0.1:1389 -x -D 'cn=exampleadmin,dc=example,dc=com' -w passw0rd -f 06_set_pqchecker_as_pwdpolicychecker.ldif
# 设置匿名用户不可读
cat << EOF >07_disable_anon.ldif
dn: cn=config
changetype: modify
add: olcDisallows
olcDisallows: bind_anon
dn: cn=config
changetype: modify
add: olcRequires
olcRequires: authc
dn: olcDatabase={-1}frontend,cn=config
changetype: modify
add: olcRequires
olcRequires: authc
EOF
ldapadd -Q -Y EXTERNAL -H ldapi:/// -f 07_disable_anon.ldif
# 设置用户可以修改自己的密码
cat << EOF >08_allow_user_modify_passwd.ldif
dn: olcDatabase={2}mdb,cn=config
changetype: modify
add: olcAccess
olcAccess: {0}to attrs=userPassword by self write by dn.base="cn=exampleadmin,dc=example,dc=com" write by anonymous auth by * none
dn: olcDatabase={2}mdb,cn=config
changetype: modify
add: olcAccess
olcAccess: {1}to * by dn.base="cn=exampleadmin,dc=example,dc=com" write by self write by * none
EOF
ldapmodify -Y EXTERNAL -H ldapi:/// -f 08_allow_user_modify_passwd.ldifMirrorMode公共配置
1
2
3
4
5
6
7
8
9
10
11
12
13
14
15
# 加载syncprov模块及overlay
cat << EOF >21_enable_syncprov.ldif
dn: cn=module{2},cn=config
objectClass: olcModuleList
cn: module
olcModulePath: /opt/bitnami/openldap/lib/openldap
olcModuleLoad: syncprov
dn: olcOverlay=syncprov,olcDatabase={2}mdb,cn=config
objectClass: olcOverlayConfig
objectClass: olcSyncProvConfig
olcOverlay: syncprov
olcSpSessionLog: 100
EOF
ldapadd -Q -Y EXTERNAL -H ldapi:/// -f 21_enable_syncprov.ldif
A、B服务器上分开操作
A-服务器
1 | # 修改server ID |
B-服务器
1 | # 修改server ID |
测试
1 |
|
Nginx开启TLS并反向代理OpenLDAP
找一台服务器安装Nginx,或者找第三台服务器安装Nginx
1 | # 配置Nginx TLS反向代理OpenLDAP |
KeyCloak安装及配置
KeyCloak高可用安装,后端链接OpenLDAP并配置用户能修改/邮件重置密码/并可让其他系统接入
高可用部署KeyCloak
部署MySQL8
1 | mkdir -p /opt/data1/docker/mysql8/data/lib/mysql |
A、B服务器上高可用部署KeyCloak公共操作
若在同一台服务器上部署多个KeyCloak实例,还没试过,应该不行,可能需要更多的配置,主要是distributed caches的高可用配置
- 构建镜像
1 | mkdir -p /opt/data1/docker/keycloak-a/build |
- 部署KeyCloak
1
2
3
4
5
6
7
8
9
10
11
12
13
14
15
16
17
18
19
20
21
22
23
24
25
26
27
28
29
30
31
32cd /opt/data1/docker/keycloak-a
cat << EOF > docker-compose.yml
version: "3.7"
services:
keycloak-a:
image: keycloak:22-v1
container_name: keycloak-a
restart: always
command:
- start
- --optimized
ports:
- "18080:8080"
- "7800:7800" #集群协商使用,不可改变映射
environment:
KC_DB: mysql
KC_DB_URL: jdbc:mysql://db.example.com:13306/keycloak
KC_DB_USERNAME: keycloak
KC_DB_PASSWORD: passw0rd
KEYCLOAK_ADMIN: examplekeycloakadmin
KEYCLOAK_ADMIN_PASSWORD: passw0rd
KC_HOSTNAME_STRICT: false
KC_HOSTNAME_STRICT_HTTPS: false
KC_HTTP_ENABLED: true
EXT-ADDR: 127.0.0.1 # 部署所在服务器的内网IP地址
KC_HOSTNAME_URL: 'https://iam.example.com'
KC_PROXY: edge
KC_FEATURES: account3,preview
EOF
docker-compose up -d
# 执行下面的命令查看到日志中的[]中有2个id,则集群成功
docker logs -f keycloak-a | grep 'Finished rebalance with members'
Nginx开启TLS并反向代理KeyCloak
找一台服务器安装Nginx,或者找第三台服务器安装Nginx
1 | cat << EOF > /etc/nginx/conf.d/keycloak.conf |
配置KeyCloak
- 访问https://iam.example.com并以examplekeycloakadmin用户登录
- 创建一个Realm example,并
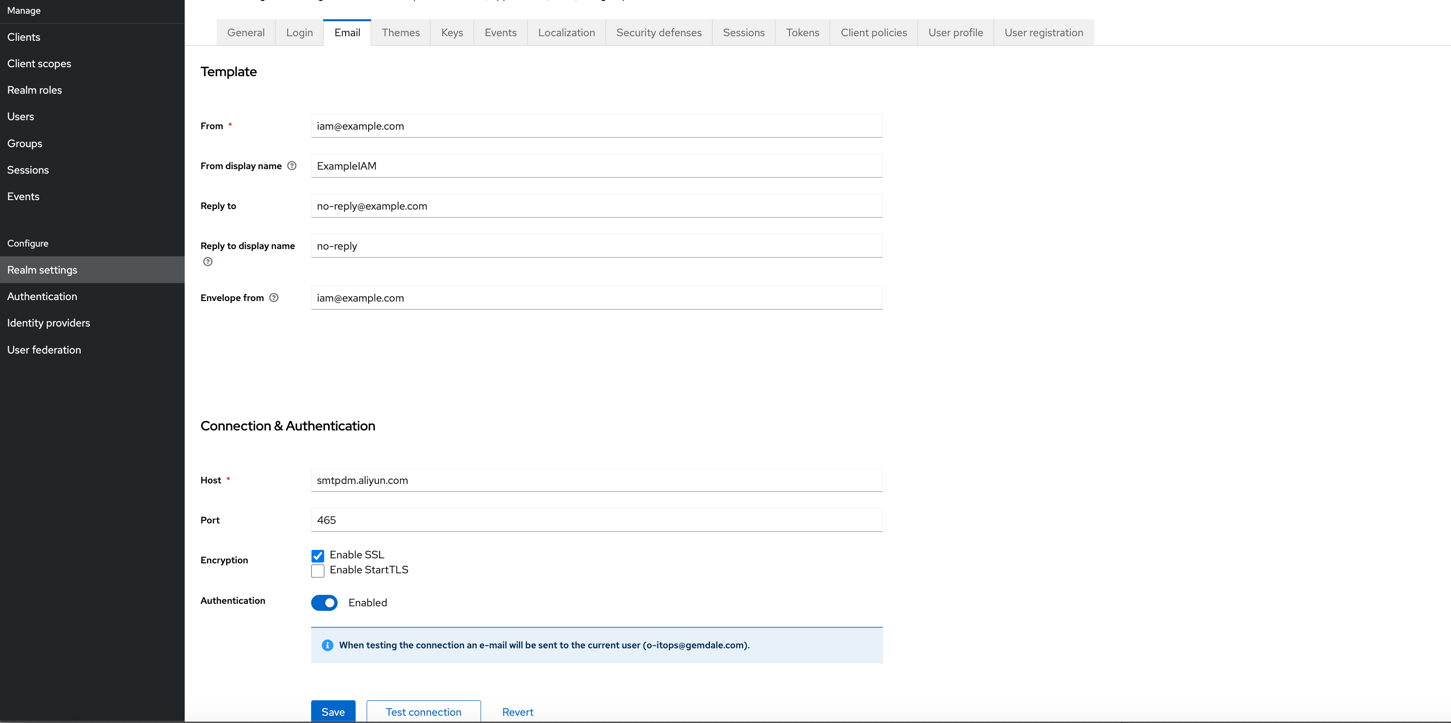
a. 添加一个LDAP的User federation,按照下图方式配置,并点击Action→Sync all users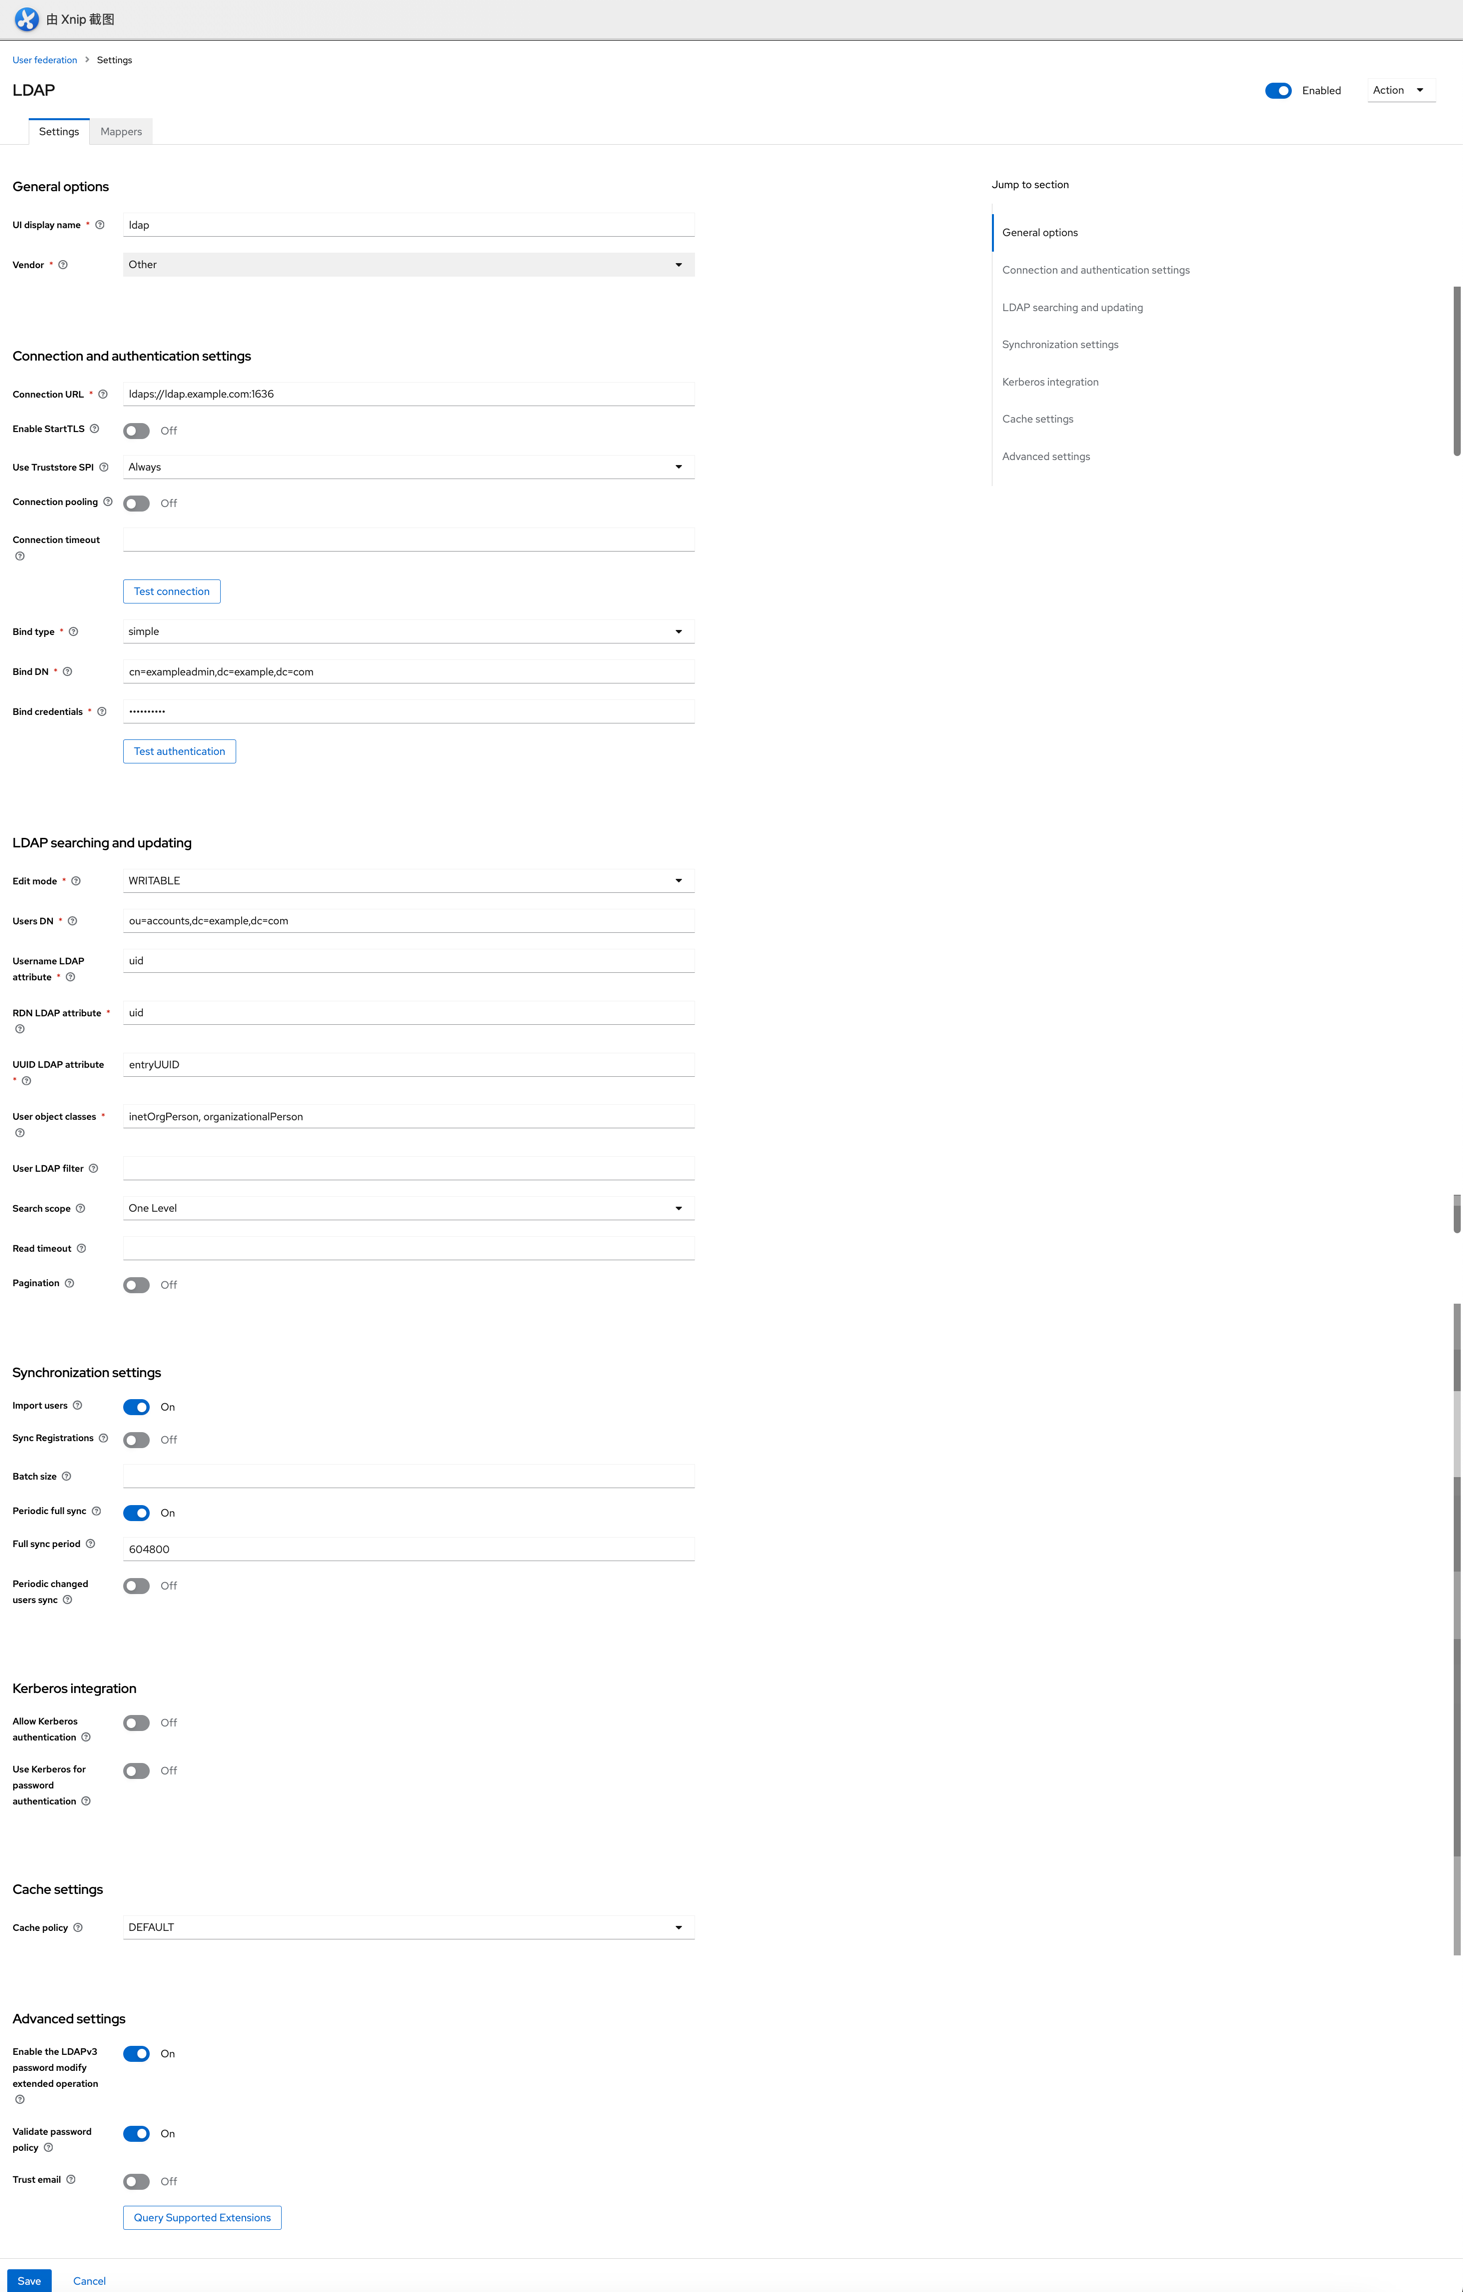 b. 按照下图方式配置邮件
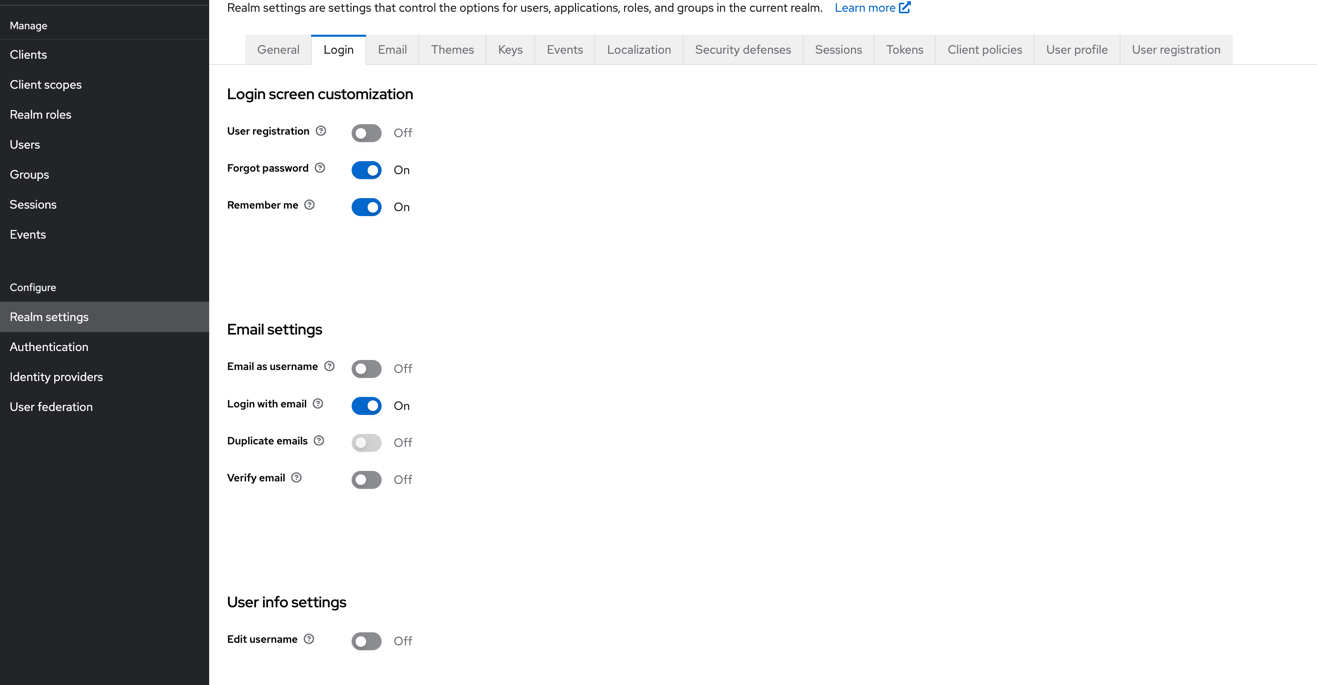
  c. 按照下图方式配置登录选项
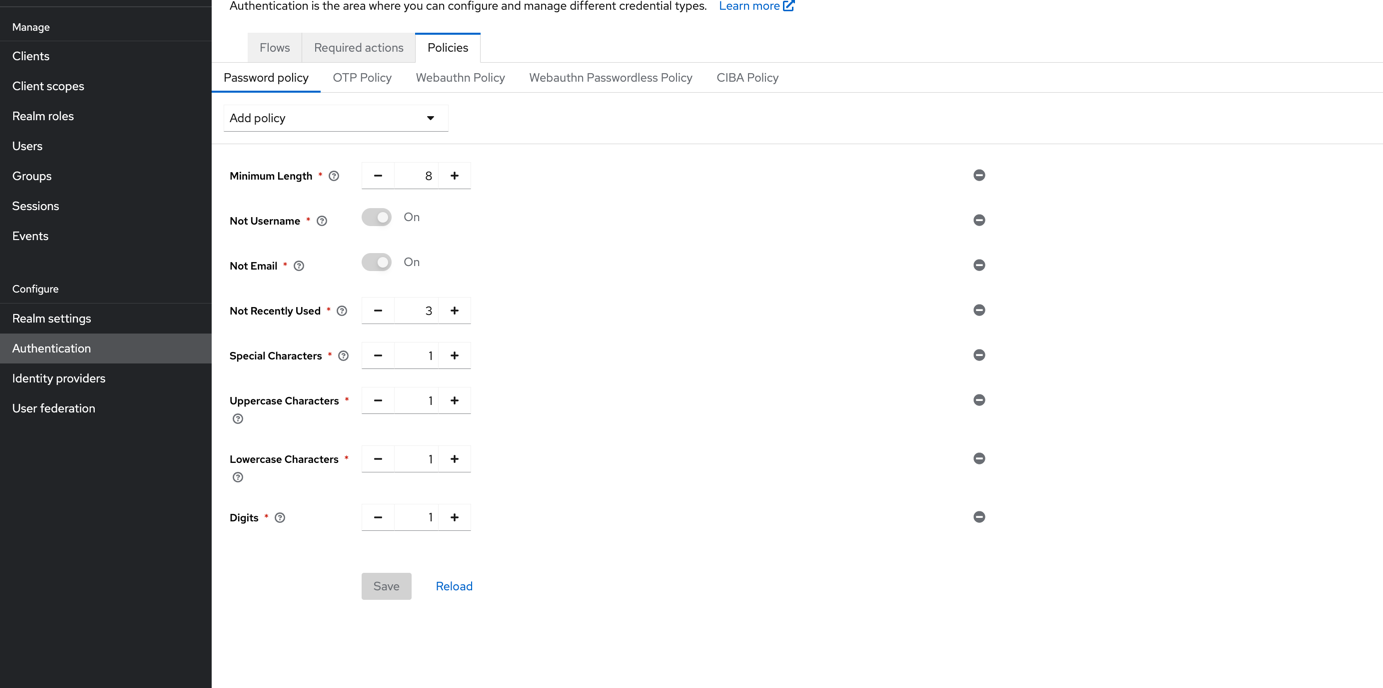
  d. 按照下图方式配置密码复杂度
- Authentication→Policies
- User federation→click ldap→TurnOn password check
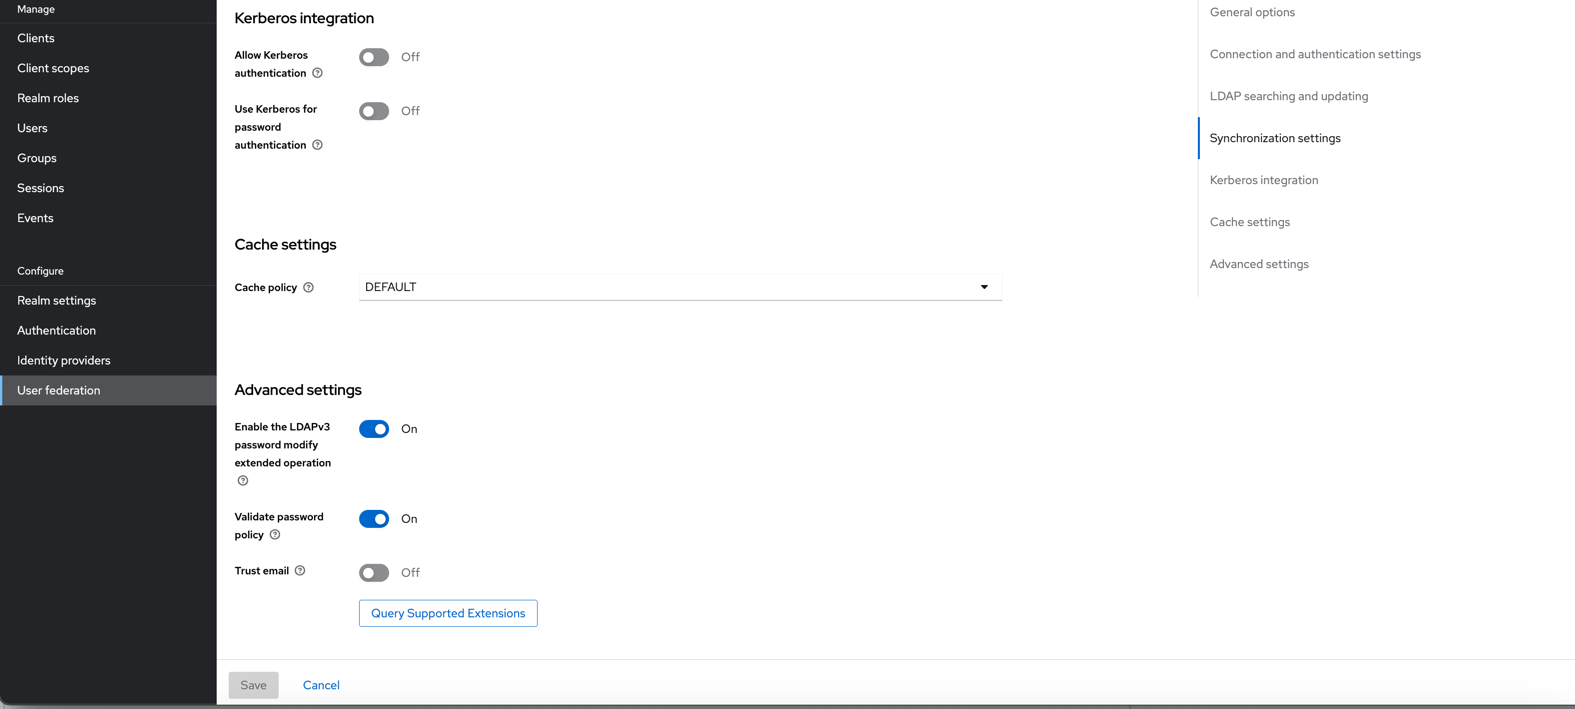 e. 按照下图方式配置,不允许用户修改个人信息,除了密码
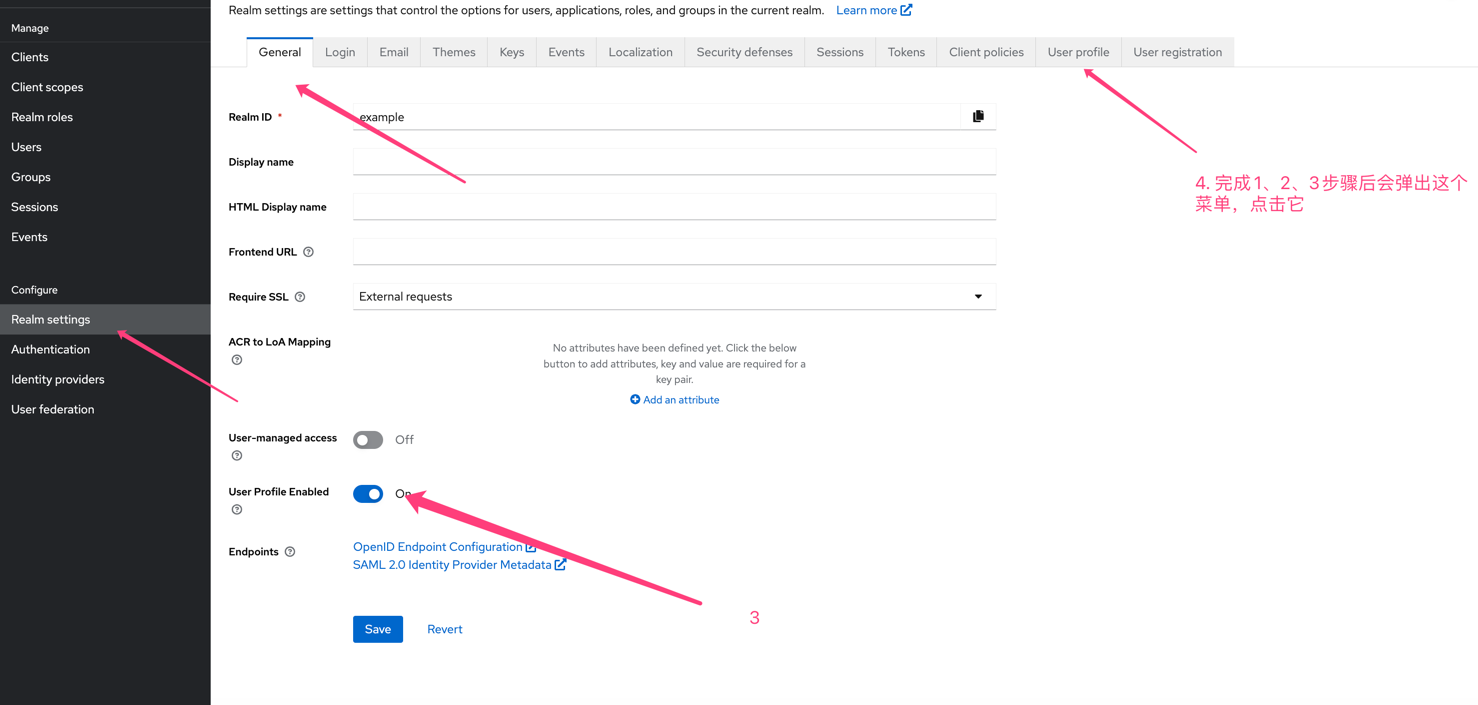
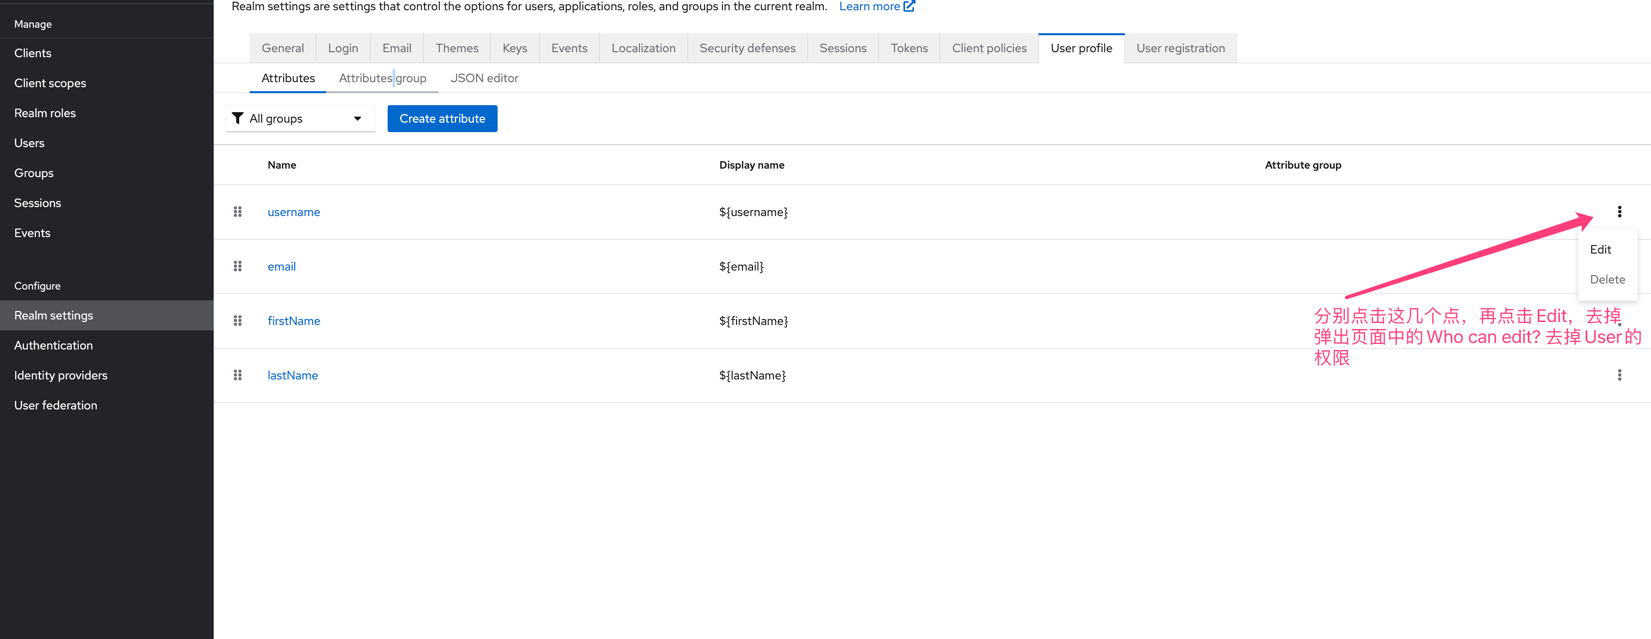
- Authentication→Policies
集成到3rd系统
Oauth2-Proxy+Nginx保护未有认证的系统
背景
- Keycloak的域名为:iam.example.com
- 要保护的未有认证系统的域名为prom.example.com(Nginx中的server_name配置)
- 在Keycloak中example Realm下的Clients创建client: oauth2-prometheus
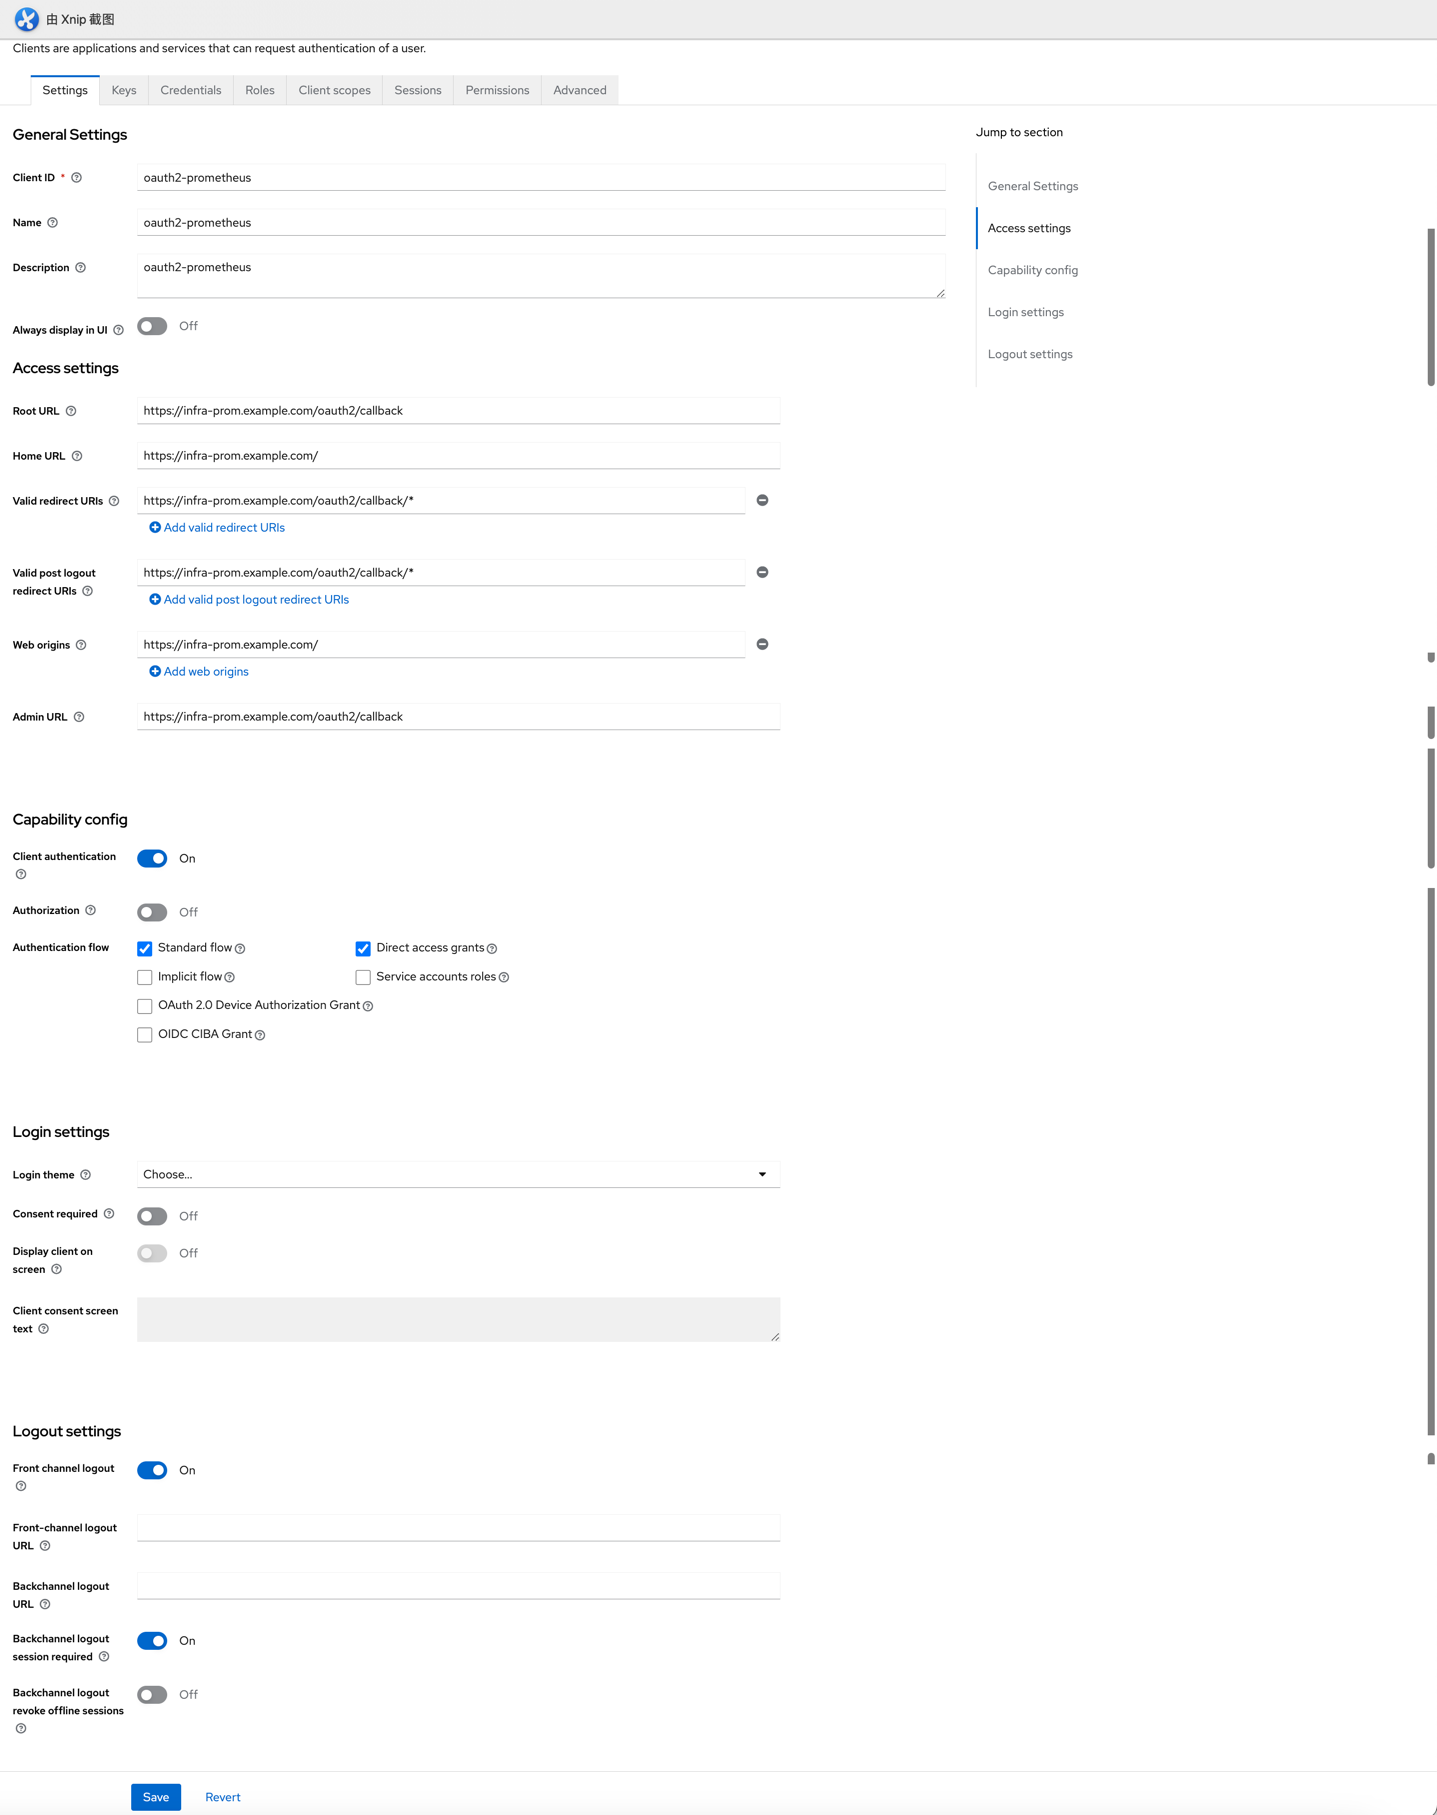
- 点击创建好的client,并点击Credentials Tab页,复制出Client secret
- docker-compose启动Oauth2-Proxy
1
2
3
4
5
6
7
8
9
10
11
12
13
14
15
16
17
18
19
20
21
22version: "3.7"
services:
oauth2-proxy-prometheus:
image: quay.io/oauth2-proxy/oauth2-proxy
container_name: oauth2-proxy-prometheus
restart: always
ports:
- "13330:4180"
command:
- --provider=keycloak
- --client-id=oauth2-prometheus
- --client-secret=xxxxx # 第二步中获取到的
- --login-url=https://iam.example.com/realms/example/protocol/openid-connect/auth
- --redeem-url=https://iam.example.com/realms/example/protocol/openid-connect/token
- --profile-url=https://iam.example.com/realms/example/protocol/openid-connect/userinfo
- --validate-url=https://iam.example.com/realms/example/protocol/openid-connect/userinfo
#- --allowed-group=/prometheus # 可以限制登录的用户为keycloak某个组
- --email-domain=example.com
- --cookie-secret=xxxx # 自由填写
- --http-address=http://0.0.0.0:4180
- --scope=openid
- --insecure-oidc-allow-unverified-email=true - Nginx配置
1
2
3
4
5
6
7
8
9
10
11
12
13
14
15
16
17
18
19
20
21
22
23
24
25
26
27
28
29
30
31
32
33
34
35
36
37
38
39
40
41
42
43
44
45
46
47
48
49
50
51
52
53
54
55upstream prometheus {
server 127.0.0.1:9090;
}
upstream oauth2-proxy-prometheus {
server 127.0.0.1:13330;
}
server {
listen 80;
listen 443 ssl;
server_name infra-prom.example.com;
ssl_certificate /etc/letsencrypt/live/example.com/fullchain.pem;
ssl_certificate_key /etc/letsencrypt/live/example.com/privkey.pem;
ssl_protocols TLSv1.2;
access_log prometheus.log;
client_max_body_size 1024m;
location /oauth2/ {
proxy_pass http://oauth2-proxy-prometheus;
proxy_set_header Host $host;
proxy_set_header X-Real-IP $remote_addr;
proxy_set_header X-Scheme $scheme;
proxy_set_header X-Auth-Request-Redirect $request_uri;
}
location = /oauth2/auth {
proxy_pass http://oauth2-proxy-prometheus;
proxy_set_header Host $host;
proxy_set_header X-Real-IP $remote_addr;
proxy_set_header X-Scheme $scheme;
# nginx auth_request includes headers but not body
proxy_set_header Content-Length "";
proxy_pass_request_body off;
}
location / {
auth_request /oauth2/auth;
error_page 401 = /oauth2/sign_in;
# pass information via X-User and X-Email headers to backend,
# requires running with --set-xauthrequest flag
auth_request_set $user $upstream_http_x_auth_request_user;
auth_request_set $email $upstream_http_x_auth_request_email;
proxy_set_header X-User $user;
proxy_set_header X-Email $email;
# if you enabled --cookie-refresh, this is needed for it to work with auth_request
# auth_request_set $auth_cookie $upstream_http_set_cookie;
# add_header Set-Cookie $auth_cookie;
proxy_set_header Host $host;
proxy_set_header X-Real-IP $remote_addr;
proxy_set_header X-Forwarded-For $proxy_add_x_forwarded_for;
proxy_pass http://prometheus;
}
GitLab集成OpenLDAP
1 | # 进入gitlab容器操作 |
Nexus3集成OpenLDAP
- 切换到管理后台Security→LDAP,Create connection并按照如下图配置
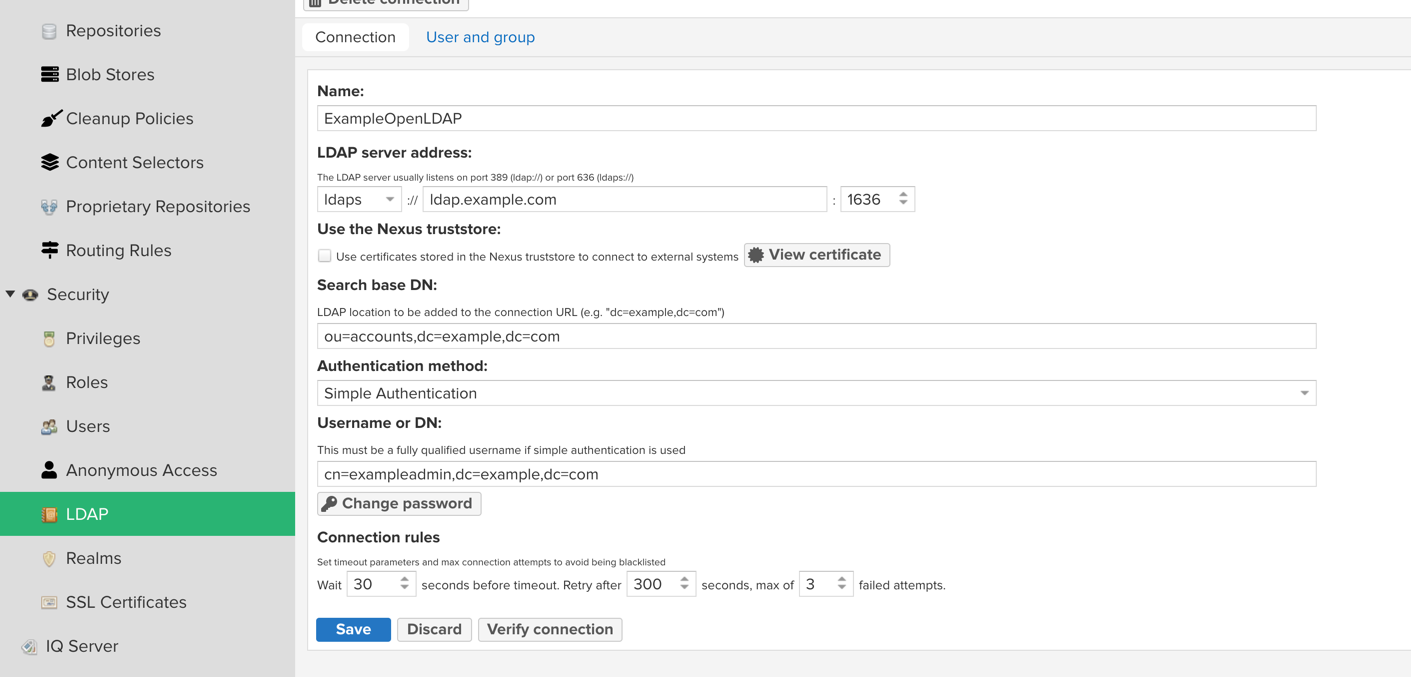
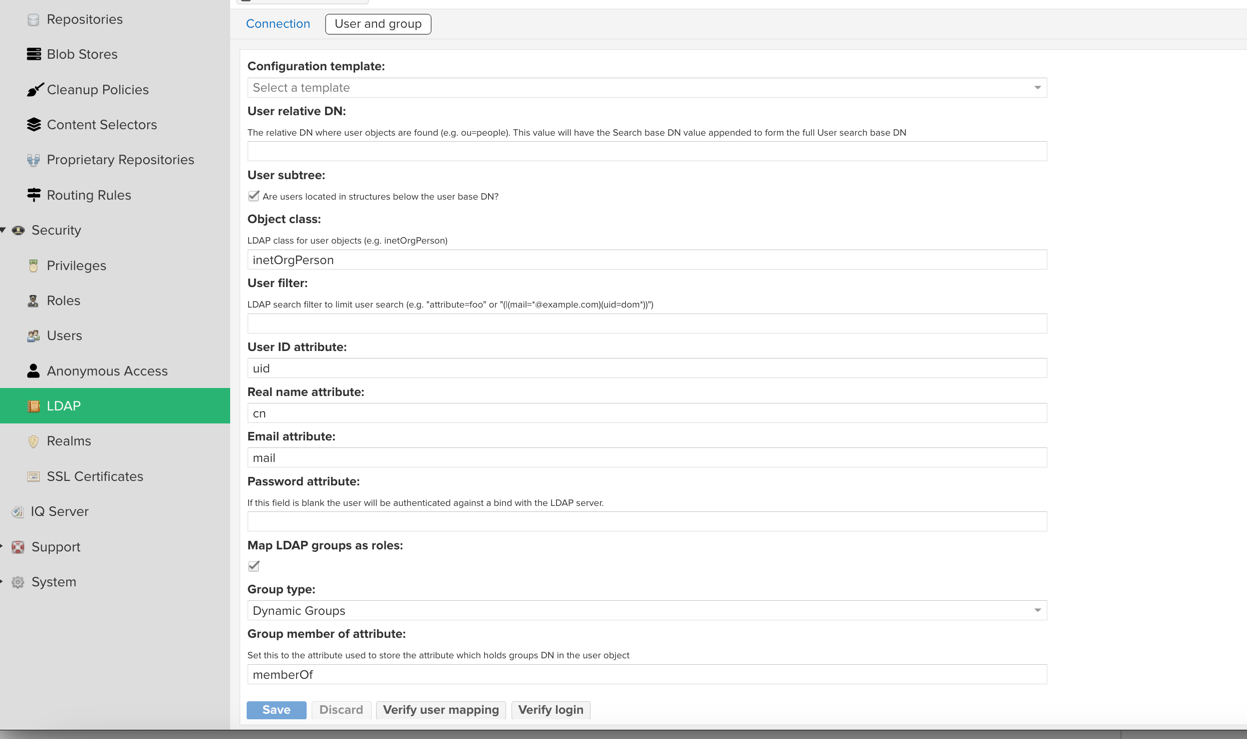
- Security→Roles配置对应的Role,此Role名字应该和用户在OpenLDAP中的memberOf的组名字一样,并赋予权限
Redash集成Keycloak
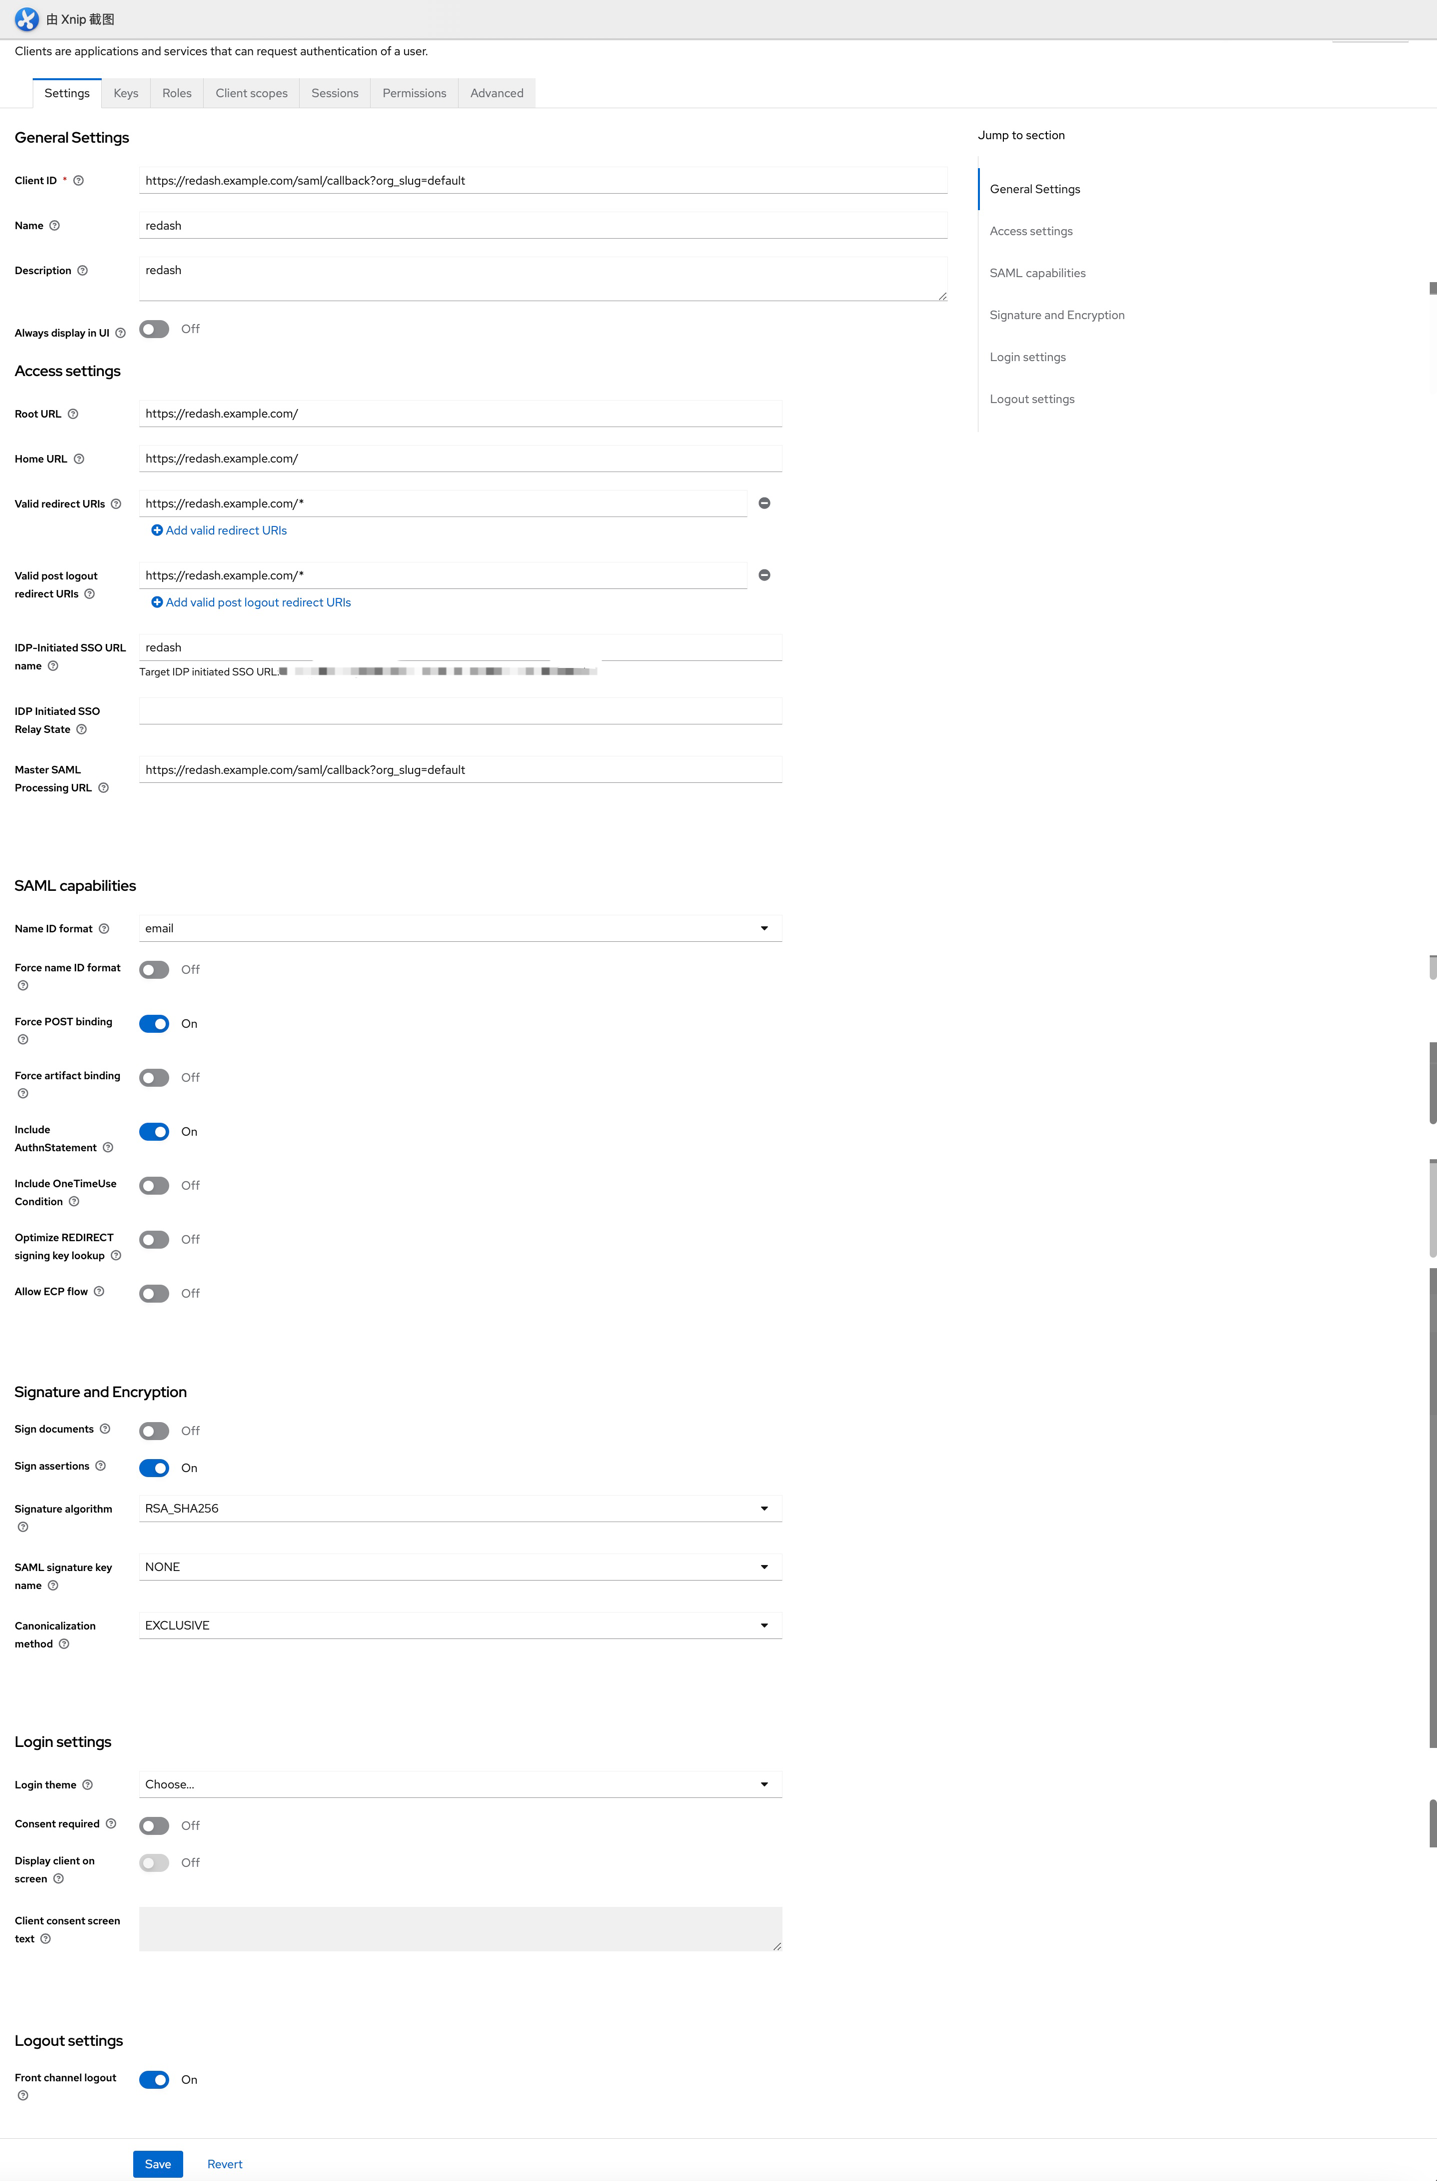
Redash有些特殊,所以在此说明配置的各组件的版本Redash-10.1.0.b50633及Keycloak-22.0.3
- Redash配置,Settings→General,并按照如下图配置
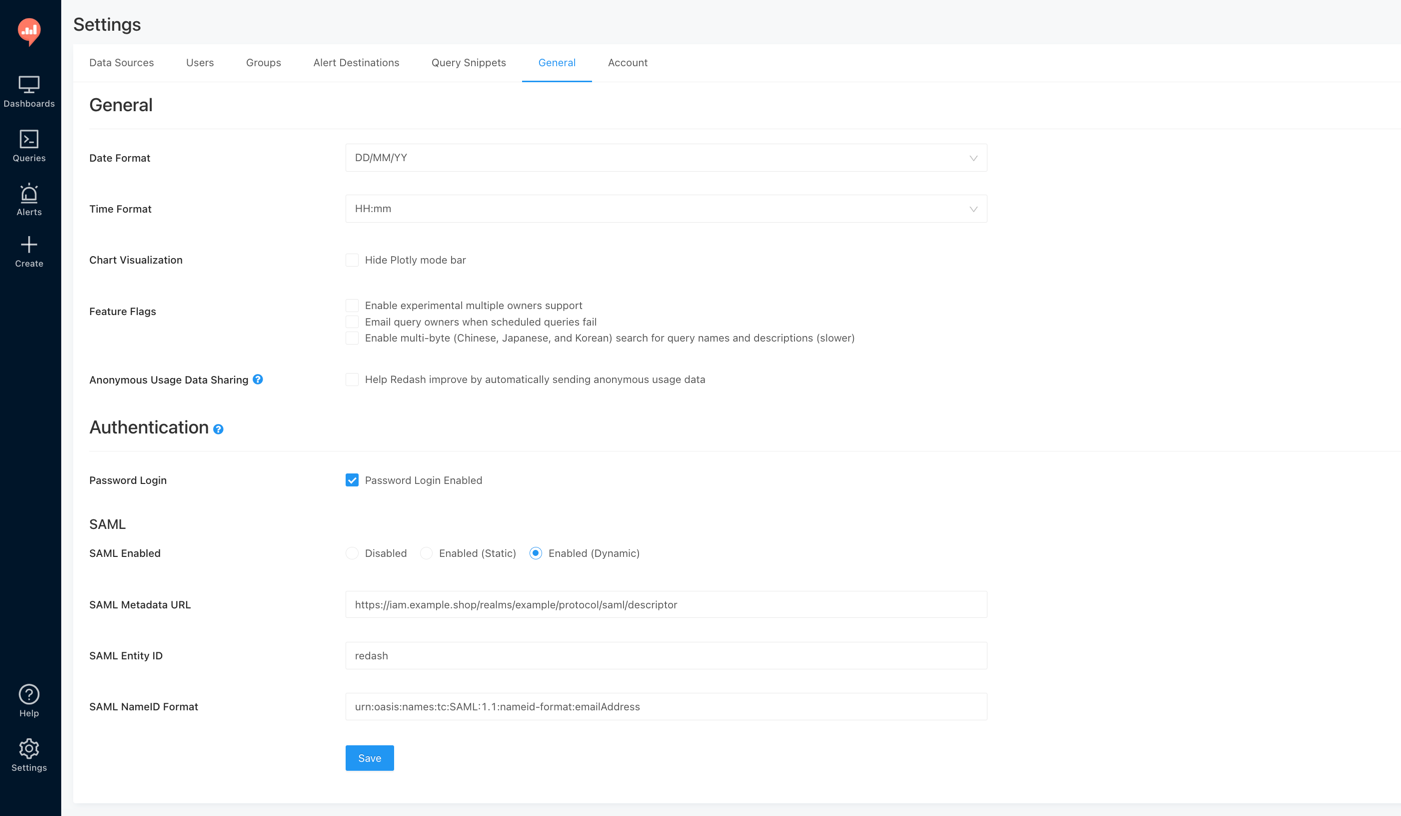
- Keycloak创建Client,Next后按照下图配置
- Keycloak的redash clients点击Keys Tab页,关闭Signing keys config和Encryption keys config
- Kecloak点击Client scopes Tab页,并点击default-dedicated配置Mapper。Add mapper→From predefined mappers→勾选X500 givenName和X500 surame,并分别点击进入做对应修改
a. firstName(Property不变)→FirstName(Friendly Name)→FirstName(SAML Attribute Name)
b. lastName(Property不变)→LastName(Friendly Name)→LastName(SAML Attribute Name)
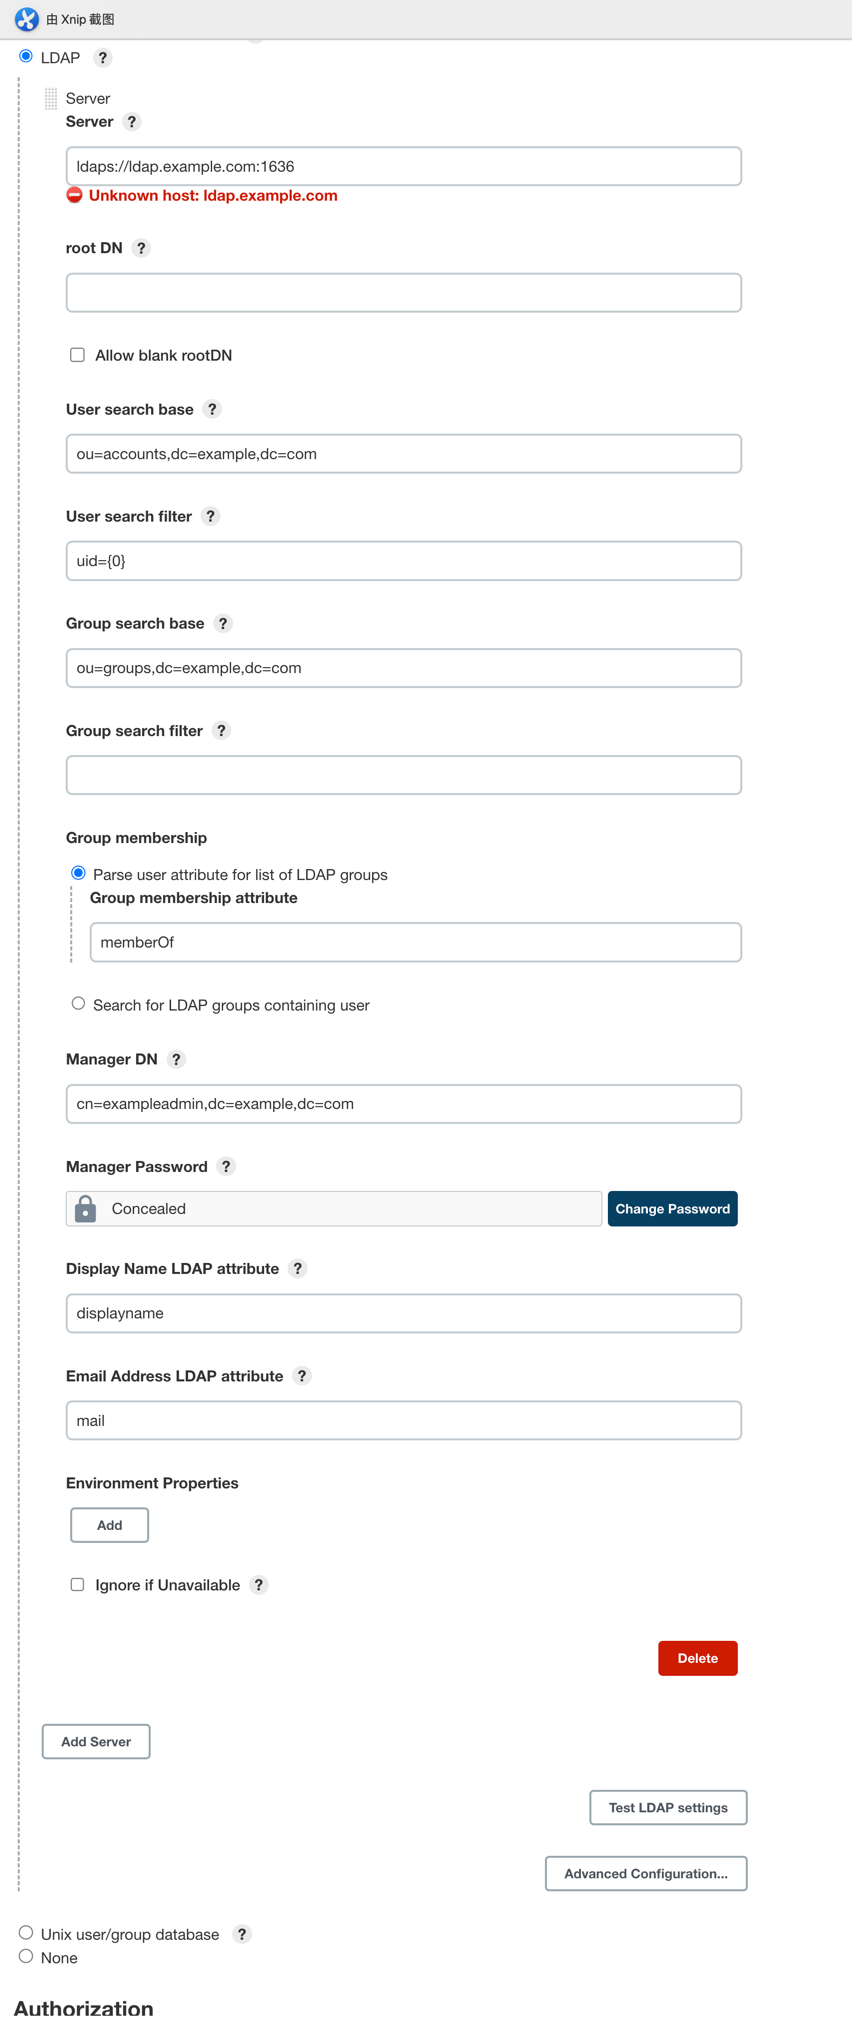
Jenkins集成OpenLDAP
- 先找台其他机器登录jenkins管理员,如果后续操作不对,立马回滚
- 在系统管理→全局安全配置中启动Role-Based Strategy,并在系统管理→Manage and Assign Roles→Assign Roles→Global roles中添加ldap中的jenkins管理账号并赋予admin权限
- 按照如下图配置即可
附录
A. OpenLDAP常用操作
常用的search命令
1 | # 用户的MemberOf |
添加/移除用户到组(groupOfUniqueNames)
1 | # 添加用户到组 |
添加用户
1 | ## 创建用户 |
设置用户不可用,即设置pwdEndTime为今天之前
1 | # 设置用户不可登录 |